

How To Paint Acrylic Portraits
Portrait painting techniques using photography.
There are many ways to paint a portrait. Many portrait painting techniques. Everyone has their own method, and all are valid. There has always been discussion about whether a portrait has to be made from real life or from photography. I will not give you an answer on that one; if a painting is good then the question need not come up. I encourage observational study as much as possible. In my opinion, good drawing skills and knowledge of anatomy, are of the utmost importance.
Click here to see long tutorial videos.
Here I will explain my portrait painting techniques when I work from photography.
Photography.
Painting a portrait from photography has advantages and disadvantages. One of the major pitfalls is the danger of paying to much attention to the details. Likeness does not depend on the details but on large volumes. Remember that old school photo. You know perfectly well who is who, although the faces are no bigger than a quarter of an inch. Often too much detail has a devastating effect on a portrait. Keep it simple and be bold with what you say. An advantage of working with photos, is that you just choose the shot you like most out of a series. Before you start, it is important to pay great attention to the photography session, and also to the printing.

The first image shows several copies of the face around my canvas on my easel. The two large photos are the same size as the portrait on the canvas. The left is slightly unfocused to avoid distraction from details. Using this photo I see the simple shapes more clearly. I have printed the smaller pictures in a lighter and a darker version.

Preparation.
On the easel is the stretched canvas. I've transferred the image by using a grid distribution on the photo as well as on the canvas. I use red crayon. The black graphite of a normal pencil will always shows through all layers of oil paint. Here I fixed the drawing with a very thin layer of shellac. Sometimes I apply a thin coating of an alkyd medium. On top, in acrylic I paint an underpainting in raw sienna. If I get lost I always can remove a layer of oil to see the basic drawing and underpainting.
Painting.
The actual painting of the portrait is about to begin. I start the day early by setting up my palette, which is done with great care. I mix the skin colors and always use a test strip to check the mixture. Before I start painting, I rub the canvas with a neutral oil medium. Then the linen is semi- saturated and the canvas "receives" the paint from my brush more easily.

First the hair.
I paint the hair in simple, large planes using different hues. I don´t simplify the hues by using middle ochre mixed with brown for the darker areas, and white for the lighter ones. In the darkest tones there is crimson, veridian, sienna and cadmium orange. In the lighter parts of the hair I´ve used cadium red light, permanent green light, viridian, yellow ochre and white. The lightest color in the hair is a mixture of ultramarine, crimson and white that I've prepared previously. This mauvish tint is great to make light areas in blond hair without the risk of progressing to red, yellow or blue.
From dark to light.
Before I start with the face I paint the background also in large simple planes. Here I dilute the paint with a few drops of citrus turpentine. Ordinary white spirit also works well. I pay particular attention to the hairline. I don´t want to be sharp. The edges must be soft where the hair touches the skin.

First I give the eyes a special treatment. I paint a transparent layer of sienna and burnt umber. I smudge the paint with my finger so that I can still see the underdrawing. This creates a perfect base to continue later.
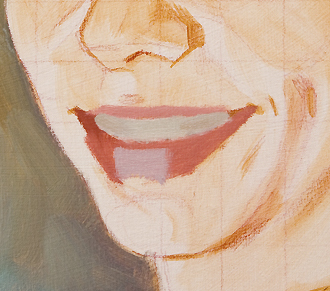
Then I paint the mouth in simple schematic planes. Cadmium red, venetian red, white and ultramarine blue are used here. I show the teeth as a continuous curved surface. I use my pre-mixed neutral gray light with some ultramarine blue and crimson.
I always start with the shadows, then the halftones, then the lights. For the flesh I mix cadmium red light, white and ochre. Cerulean blue or permanent yellow-green tones are used for cooler or warmer tones. I'm still avoiding any details!

Keep a distance.
The portrait is in the first phase and I have to go away. I walk off and have a cup of coffee or something. It is important to leave the easel. The longer I look at my canvas the less I can judge what I have painted. Having a coffee is one trick, but there are more. In my studio I have a mirror in which I can see both the painting and the photograph at the same time. I wear glasses. I take them off and see everything blurred. This is particulary good to get a perfect overall look at the balance of colour and emphasis.
Now I just take my time to assess everything. I retrace the portrait again from dark to light and finally put in some details. Then I finish the eyes and paint that small highlight in the pupil. Where necessary I blend surfaces together sometimes with a separate tone in an intermediate color. Looking at the cheeks, where the transition is important and can be subtle, I make sure that the curves are in the right place.

There is a certain risk of overblending the portrait in this phase. I paint the separation between the upper teeth and lower lip. I do not make individual teeth, but make sure the curve provides sufficient suggestion of teeth.
Finally, on the wet background I paint some brush strokes for locks of hair.
There are many portrait painting techniques as I said. Not always I follow this method. Even I change from time to time.
How To Paint Acrylic Portraits
Source: https://paintingportraittips.com/homepage-old/portrait-painting-techniques/
Posted by: harristheadis.blogspot.com
0 Response to "How To Paint Acrylic Portraits"
Post a Comment